Building Personal DMR HotSPOT:
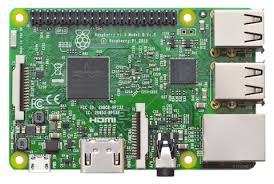
Raspberry Pi-3B board $35 at Fry's

Zum Spot($110 at Ham radio outlet) or
JumboSpot MMDVM Support P25, DMR, D-Star, YSF, for raspberry pi + Antenna (as little as $35.00 from China on eBay)
running Pi-Star image 3.4.15, 16gb or 32gb SD micro card($20).
SD card reader($14) if computer has build in reader don't need to buy one.
Pi-star case $ 20

sample image Raspberry Pi with JumboSpot on top.
Make Pi-Star Image:
1. Make a folder on your desktop called “PiFix”
2. Go here and download the FREE SD card formatter: https://www.sdcard.org/downloads/formatter_4/
3. Go here and download the FREE etcher program: https://etcher.io/
4. Install both programs above and place a shortcut for each in the “PiFix” folder
5. Go here and download the FREE Pi-Star image: https://www.pistar.uk/downloads/
6. Download: Pi-Star_RPi_V3.4.11_17-Mar-2018.zip ( or the most latest version available)
7. Save the Pi-Star image in the “PiFix” folder
8. Select the Pi-Star_RPi_V3.4.11_17-Mar-2018.zip and extract into the “PiFix” folder
9. Only the .IMG file is needed, delete the other file after extraction
10. Go here: https://www.pistar.uk/wifi_builder.php Enter your SSID & Password, submit, save to “PiFix” folder
11. You now have a wpa_supplicant.conf file with your SSID & Password, SD formatter, Etcher, and a fresh PiStar image in your “PiFix” folder, all the elements required to make a fresh new clean Pi-Star image.
12. Insert your micro SD card into your computer and QUICK format with SD formatter, remove card.
13. Open ETCHER, RE-INSERT the micro SD CARD, follow the prompts from left to right to ETCH the Pi-Star image in your “PiFix” folder and wait till complete 100% complete and validated, 3 to 5 minutes typically.
14. Remove micro SD card, re-insert micro SD card into computer, drag the wpa_supplicant.conf file with your SSID and PASSWORD directly into the ROOT directory of the SD card, now called “BOOT”
15. EJECT the micro SD card and INSERT into device, you now have a FRESH PI-STAR IMAGE.
16. TURN ON the device matching the SSID & Password you entered into the wpa_Supplicant.conf file.
17. Log into the same device now with your computer.
18. POWER up the device and WAIT 3 to 5 minutes.
19. Go to your browser and enter: http://pi-star/admin/expert/edit_mmdvmhost.php
20. User Name: pi-star Password: raspberry (case sensitive !!!)
Note: RPi will only accept “pi-star / raspberry “ in LOWER case
21. Go to MODEM area, enter 500 in the exact same TWO fields below, SAVE.
if you have problem building image, please post on this site.
I can help you.
7 3